The Benefits of Exercise for Seniors
April 26, 2026

Creating a navigation bar in Android Studio for a blog app typically involves using the Navigation Component, which simplifies the navigation between different fragments or screens in your app. Here's a step-by-step guide to create a basic navigation bar for a blog app:
If you haven't already, create a new Android Studio project. Make sure you select a template with a Navigation Drawer or Bottom Navigation, as these templates come with pre-configured navigation components.
Design the layout for your navigation bar. If you're using a Bottom Navigation Bar, you can use the `BottomNavigationView` widget. If you're using a Navigation Drawer, you can use a `DrawerLayout` with a `NavigationView` inside it.
Create fragments for the different screens of your blog app. Each screen will be represented by a fragment.
In Android Studio, go to the "res" folder and right-click on "res" -> "New" -> "Android Resource File." Name it "nav_graph." Open this navigation graph.
- In the navigation graph, you can define the different destinations (fragments) and the connections between them.
- You can add actions to represent the transitions between fragments.
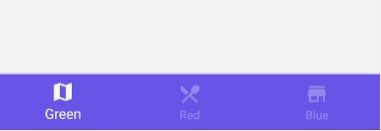
- For Bottom Navigation: In your activity layout file (e.g., `activity_main.xml`), include the `BottomNavigationView` and set it up with the navigation graph.
<com.google.android.material.bottomnavigation.BottomNavigationView
android:id="@+id/bottom_navigation_view"
android:layout_width="match_parent"
android:layout_height="wrap_content"
app:menu="@menu/bottom_nav_menu"
app:layout_constraintBottom_toBottomOf="parent"
app:layout_constraintTop_toBottomOf="@id/nav_host_fragment" />
In this example, `@menu/bottom_nav_menu` is a menu resource file that defines the items for the bottom navigation.
- For Navigation Drawer: Set up your `DrawerLayout` and `NavigationView` in your activity layout.
- For Bottom Navigation: In your activity or fragment, you can use `NavigationUI` to set up the navigation controller and handle clicks on the bottom navigation items.
BottomNavigationView bottomNavigationView = findViewById(R.id.bottom_navigation_view);
NavController navController = Navigation.findNavController(this, R.id.nav_host_fragment);
NavigationUI.setupWithNavController(bottomNavigationView, navController);
- For Navigation Drawer: Handle navigation drawer item clicks to navigate between fragments.
NavigationView navigationView = findViewById(R.id.navigation_view);
NavController navController = Navigation.findNavController(this, R.id.nav_host_fragment);
NavigationUI.setupWithNavController(navigationView, navController);
In your fragments, you can navigate to other fragments using the `NavController`. For example, to navigate to a different fragment when a button is clicked:
Button button = findViewById(R.id.button);
button.setOnClickListener(view -> {
navController.navigate(R.id.action_current_fragment_to_destination_fragment);
});
Run your app in the emulator or on a physical device to test the navigation functionality.
This is a simplified overview of setting up navigation in Android using the Navigation Component. Depending on your app's complexity and specific requirements, you may need to customize your navigation further.

April 26, 2026

April 26, 2026

April 26, 2026

April 26, 2026

April 26, 2026

April 26, 2026

April 26, 2026

April 26, 2026

April 26, 2026

April 26, 2026